


Tying a knot correctly takes just a moment, but a mistake when tightening it could cost you the catch of a lifetime. Learn seven practical fishing knots that will reliably secure your hooks, leaders, and artificial lures.
Which Fishing Knots Are Worth Knowing
When you’re out on the water, you basically need to do three things: attach a hook, join two pieces of line, and create a secure loop. You don’t need to know dozens of variations—a few well-practiced knots that are perfectly suited to your gear will be more than enough.
|
What You Need to Tie |
The Right Knot |
|---|---|
|
A hook, swivel, or snap swivel on nylon |
Improved Clinch |
|
A hook or carabiner on braided line |
Palomar |
|
Hook with a blade |
Overhand knot |
|
Two monofilament lines or braided line with a leader |
Double Uni |
|
Fixed end loop |
Double surgical knot |
|
Wobbler in a loose loop |
Rapala knot |
|
Hook with a leader for boilies or pellets |
Knotless rigging |
Always choose a specific knot based on the material and its diameter. While classic nylon tends to be flexible, fluorocarbon is noticeably stiffer, and even smooth braided line can be tricky—it simply slips out of some knots. For both monofilament and braided lines, therefore, it’s best to follow the manufacturer’s recommendations for the ideal knot and number of wraps.
In our instructions, the free end refers to the part you thread through and wrap around when tying the knot. The main section then logically leads to the reel or forms a longer section of the leader. Make sure you have enough material for the job and keep a pair of sharp scissors handy.
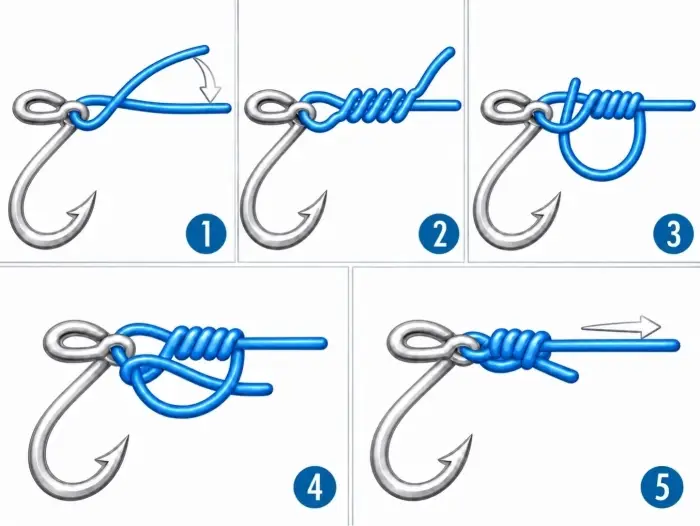
How to Tie a Hook with an Eye Using an Improved Clinch Knot
The improved clinch knot is a fishing classic. It’s excellent for attaching nylon line to a hook, swivel, or carabiner. However, with thick and stiff materials (such as thick fluorocarbon), it’s harder to set and doesn’t always tighten properly. Furthermore, if you’re fishing with smooth braided line, it’s better to use a different knot (the Palomar, for example, holds up great), because the clinch knot might slip on it.
How to Tie a Clinch Knot
- Thread the end of the line through the hook eye, leaving about 15 cm of line to work with.
- Wrap the loose end of the line five to six times around the main section, moving upward from the hook eye.
- Then bring it back down and thread it through the small opening formed just below the hook eye and the first wrap.
- Next, pull the free end through the large loop you created in the previous step (this step is what makes the clinch “improved”).
- Moisten the knot well. Hold the loose end and, with a smooth pull on the main section, tighten all the wraps firmly against the eye. Finally, test the knot and trim off any excess line.
A Simple Knot for Braided Line: The Palomar
The Palomar knot works reliably with braided line, but it’s also suitable for sufficiently flexible nylon or fluorocarbon. Just keep in mind that the doubled line must pass through the eye, and you must then thread the entire hook through the resulting loop.
How to Tie a Palomar
- Fold the end of the line to create a doubled section about 15 cm long. Then thread the resulting fold through the hook’s eye.
- Tie a simple knot with the doubled section—exactly the kind you make as the first step when tying your shoelaces. But leave it loose on purpose and don’t tighten it yet.
- Pull the resulting end loop over the entire hook (or carabiner) and bring it back up to the eye.
- Carefully moisten the entire knot, align the two parallel strands of material side by side, and gradually tighten by pulling on both the main and loose ends. Finally, test the strength of the knot and trim off any excess.
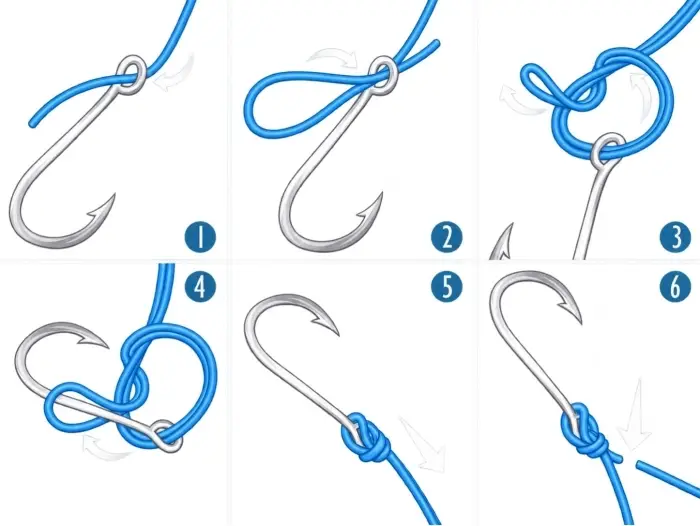
Be very careful that the loop does not get caught on the hook’s point or shank while tightening. Additionally, if you’re fishing with larger artificial lures, it’s often much more practical to tie the Palomar knot directly onto the carabiner and clip the lure onto it at the very end.
How to Tie a Hook with a Blade
A hook with a blade has no eye. The line is tied directly around the shank, and the flat end (blade) reliably prevents the knot from slipping. You’ll especially appreciate and make good use of this knot when using delicate fishing techniques, such as float fishing or feeder fishing.
How to Tie a Wrap Knot
- Fold the end of the line to form a narrow loop and place it along the hook shank. The bend of the loop should point down toward the hook bend.
- Hold the hook and both sections of the line firmly at the shank. Then, carefully wrap the free end around the shank along with the line placed against it about six to eight times. Work neatly from the shank down toward the hook eye.
- Next, pull the end of the line through the remaining loop at the bottom near the gape. Hold all the wraps in place with your fingers, moisten the knot, and gradually tighten it.
- Position the finished knot just below the shank. Here’s a crucial detail to note: with a standard outward-curved shank, the main loaded section of the line must always run along the inside of the hook (toward the point). Otherwise, when fighting a fish, the line would rub against the sharp edge of the hook shank and could easily be cut.
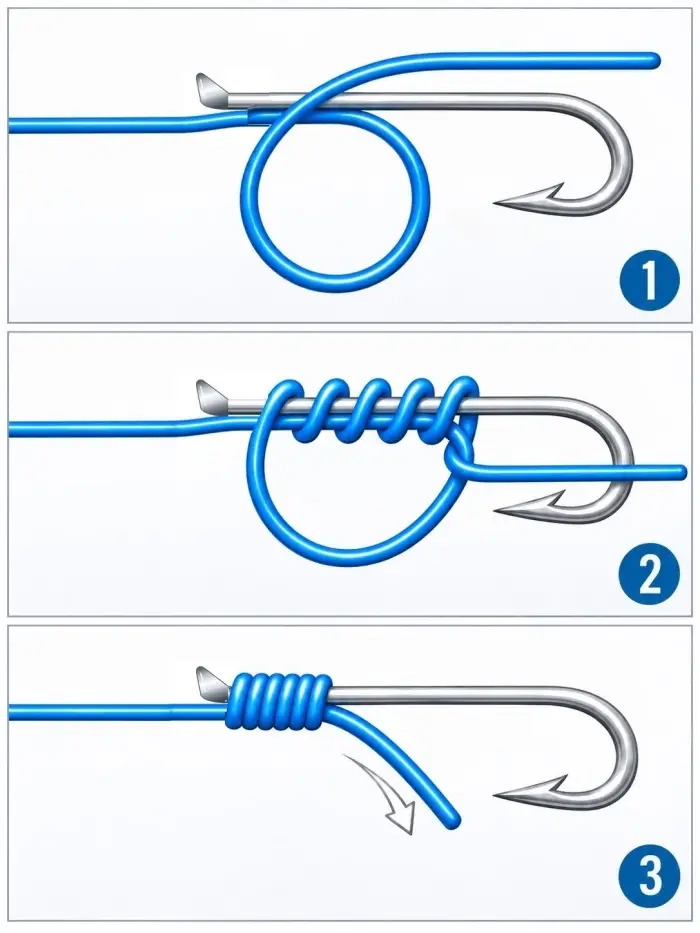
While tying, make sure to place each wrap precisely next to the one before it; they must not overlap. If you’re fishing with very small hooks, a practical hook tying tool will make your job much easier. When preparing your rig, don’t forget to ensure the hook size is appropriate for the chosen lure.
How to Connect Two Lines or a Line to a Braided Line
When spin fishing or feeder fishing, you’ll often need to connect the main braided line to a monofilament or fluorocarbon leader. The double uni knot (often referred to as a double grinner) works perfectly for this. It’s simple: you tie two separate knots that, when tightened, slide together and lock firmly in place.
Step-by-Step Guide to Tying a Double Uni Knot
- Place both lines side by side so that they overlap by about 20 cm. The loose ends should point in opposite directions.
- Take one of the loose ends and form a loop with it, then place the loop along both parallel lines.
- Now wrap this loose end around both lines inside the loop. Each individual wrap should pass through the center of the loop.
- For standard nylon or fluorocarbon, about six wraps are sufficient. However, with a smooth braided line, add a few more and feel free to make eight wraps to ensure the connection doesn’t slip. Always take into account any recommendations from the line manufacturer.
- Moisten the resulting knot base thoroughly and pull the loose end to tighten it (but not all the way yet). Then repeat this entire procedure (steps 2 through 5) with the loose end of the second line.
- Once both knots are complete, grasp both main sections and pull them smoothly. The knots will slide together and tighten securely. Finally, test the strength of the connection and trim off any excess ends.
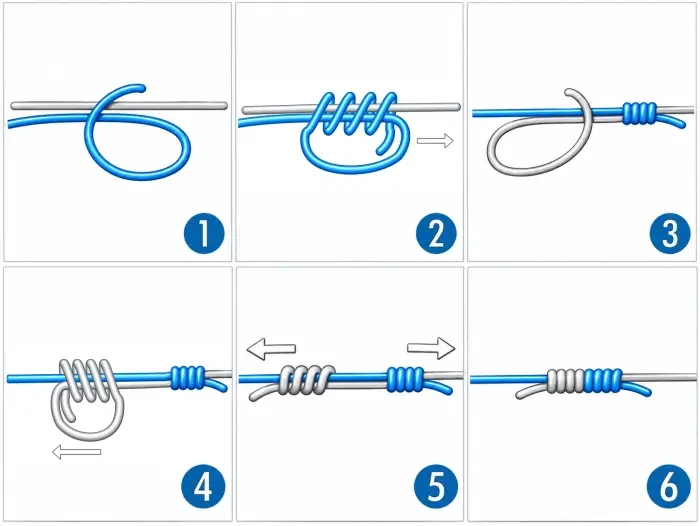
If you’re splicing a very thin braided line to a thick leader, be sure to carefully check the finished knot. With thicker diameters, the double Uni knot can be quite bulky, which sometimes causes it to get caught on the small guides of the rod when casting. An excellent alternative for these situations is the significantly slimmer FG knot, though tying it requires a bit more practice and some dedicated training.
How to Make a Secure Loop on a Leader
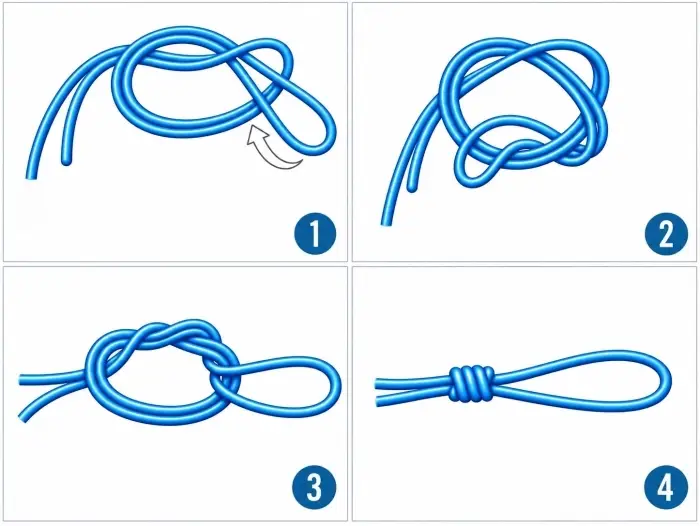
For quick leader changes using the popular “loop-to-loop” system, a double surgical knot is a reliable choice. It holds up excellently on both classic nylon line and stiffer fluorocarbon.
How to tie a double surgical knot
- Fold the end of the line so that you can work with both parts together as a single doubled strand.
- Tie a loose single knot in this doubled strand. Then thread the folded end (the resulting loop) through the loop one more time. It will pass through the loop a total of two times.
- Adjust the end loop to the desired size, thoroughly moisten the material, and tighten the knot by pulling the loop smoothly against the two remaining ends.
- Check that the knot is secure, test the strength of the connection, and trim off the excess end.
When tying the knot, thread the loop of the main line through the loop of the leader. Then take the entire leader, including the hook, and pull it through the loop of the main line. After carefully tightening it, the two loops will fit together neatly (locking into each other like links in a chain).
Rapala Knot for Free Lure Movement
The Rapala knot creates a secure, non-slipping loop that ensures wobblers have maximum freedom and natural movement in the water. It works great on nylon or sufficiently flexible fluorocarbon in situations where you want to tie the lure directly without using a snap or swivel.
How to Tie the Rapala Knot
- Tie a simple knot on the line a short distance from the end, but do not tighten it yet (leave it open).
- Thread the loose end through the lure’s eye and then pull it through the center of your open knot.
- Then wrap the loose end three times upward around the main section of the line.
- Now bring the end of the line back down and thread it through the eye of the original simple knot again. This will create a new large loop—pull the loose end through it as well.
- Thoroughly moisten the entire base of the knot. Adjust the loop to the desired size right next to the lure, and slowly and smoothly tighten the knot. Finally, test the connection and trim off the excess line.
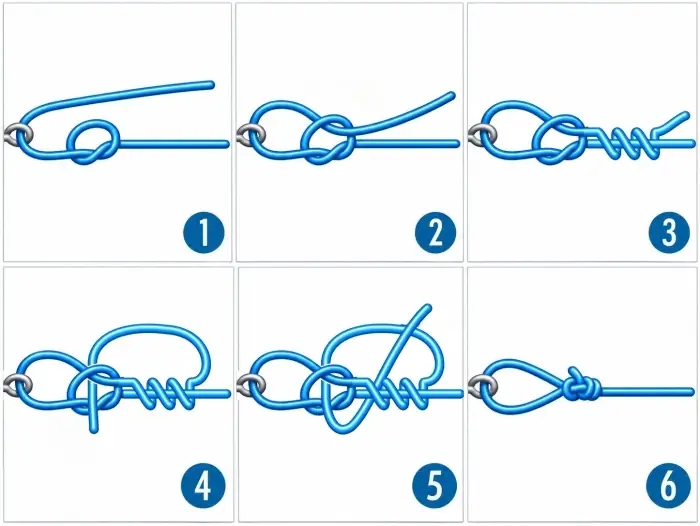
A properly tied loop holds its shape; when pulled, it must not slide toward the eye, and the front treble hook must not get caught in it. Before your first cast, always test how the rig moves in shallow water near the shore to be sure.
Knotless Rigging for Carp Leaders
When fishing for carp with boilies or pellets, the bait is most often placed freely below the hook on what’s called a “hair rig.” The classic knotless rig is absolutely ideal for preparing this effective rig.
How to Tie a Simple Hair Rig
- First, create a small loop at the end of the soft leader line. This loop will serve as a stopper.
- Using a needle, attach the bait to the leader and precisely adjust its length (distance from the hook) according to the size of the chosen bait.
- Thread the second, long end of the line through the hook eye—strictly from back to front, that is, toward the tip. For now, hold the leader with the bait along the back of the shank.
- Begin carefully wrapping the long section of the line around the shank and the attached leader. Work from the eye toward the bend, roughly to the level of the hook’s barb.
- Next, bring the long end back to the eye and thread it through again—once more from back to front toward the hook point. Tighten everything securely, test the strength of the knot, and check the resulting lure spacing.
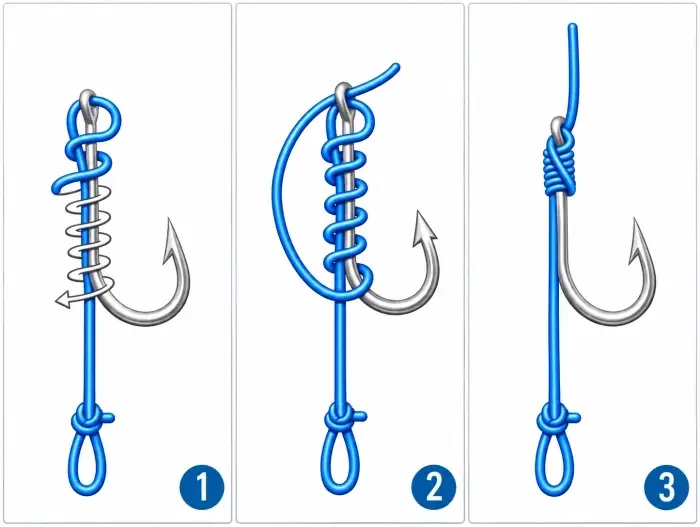
It is absolutely crucial that the main line exits the eye on the inside near the hook point. This is what ensures that the hook will curl and set properly when the fish takes the bait.
For practice, we recommend starting with a soft leader and a classic hook shape. If you were to use stiff fluorocarbon and a hook with an improperly curved eye, it could completely disrupt the mechanics and the hook’s proper positioning underwater.
What to Watch for When Tightening and Checking the Knot
Whenever tying a rig, it’s important to follow a few basic rules:
- Moisten the knot and tighten it gradually. As mentioned earlier, quickly pulling a dry line can cause the material to fray due to friction and significantly weaken its strength.
- If the knot is uneven, re-tie it immediately. You cannot fix overlapping strands by pulling harder. It’s better to cut everything off and start over.
- Don’t cut the line until after you’ve tested it for strength. Remove any excess ends only after you’ve reliably verified the strength of the knot. Also, always leave a short overlap depending on the material used and the type of knot.
- Protect your hands. When testing strength, never wrap thin braided line around your bare fingers (it can easily cut into your skin), and always secure the hook properly.
- Inspect the area around the knot. After tying each knot, be sure to remove any frayed section of the line. Also monitor the condition of your tackle—even the best knot won’t fix a sharp edge on a hook eye or a cracked rod guide.
Frequently Asked Questions About Fishing Knots
When should you use a different type of knot, and when is it enough to just check it? It depends primarily on the material and the current condition of the entire connection. Here are the answers to the most common questions.
Which fishing knot is the strongest?
There is no universal winner. The resulting strength always depends on the specific material, its diameter, and the precision of your knot-tying technique. It’s best to choose a knot suitable for your gear and practice tying it reliably until you’ve mastered it.
Why does the knot come undone even when tied tightly?
There could be several reasons: you may have skipped the final pull-through, a section may not have been tightened properly, or the knot you chose simply isn’t suitable for the material (a common problem with smooth braided line). In that case, double-check the entire tying process.
Do I have to retie the knot after every fish?
At the very least, check it thoroughly after every fish. As soon as you notice even the slightest damage to the material or any shifting of the wraps, cut the knot and retie it using a clean, undamaged section of the line or braided line.
Practice tying knots before your fishing trip
Always start with a new knot in the comfort of your own home. Use a thicker fishing line or string, which will make it much easier to see the individual steps and bends. Only once you’ve mastered the entire process should you try tying it on the tackle you’ll actually be using for fishing.